Pages

Monday, December 4, 2017

On RIngo Lake- 2017 Bonnie Hunter Mystery Clues 1 & 2

Like many quilter's across the country, I eagerly awaited Black Friday morning and the release of the first clue for "On Ringo Lake." For those not familiar with the mystery, go on over to the Quiltville website and check out the Mystery Quilt!
 
The recommended colors are neutrals, brown, corals and teals. I am going with that colorway with the exception that I am substituting a constant grey for the scrappy browns, and also using a constant neutral for the scrappy ones. While I like scrappy quilts, there is a limit to the scrappiness that I prefer. Having a constant or two in there, helps calm things down I think.


Clue 1 sewed up pretty quickly. Fifty nine patch blocks were done before the first weekend closed. So, feeling quite accomplished, I decided to make a second quilt in a Christmas colorway. In this one I went with the total scrappiness....hoping it will all work out!


Started working on Clue 2 yesterday at an open sew of our Guild meeting. While there are many methods for making flying geese, I prefer the "No Waste" method that uses a large square and 4 smaller squares. If you google, no waste flying geese you will find a "gaggle" of tutorials and videos that describe this method. Here is one at Patch Pieces. There are also charts that prefigure the sizes if you are math averse. For this project I used a 4 1/4 inch large square and 2 3/8 inch smaller squares.


That was it for the weekend, will have to tuck in some other sewing time to finish before Friday!

Wednesday, October 25, 2017

English Paper Piecing - Tidewater Quilter's Guild Fall Festival

This past Saturday I attended our local quilt guild's annual Fall Festival. This year the activity was English Paper Piecing with three levels offered from beginner to advanced. I attended the intermediate group working on the "Lucy Boston Block."
 
The original Lucy Boston Patchwork of the Crosses quilt is about queen size (88 x 99 inches /224 x 252cm), made up of 56 blocks (7 x 8) and is found in the book by Linda Franz


The pattern is really fun, because each block made from 24, 1 inch 90 degree hexagons, looks different due to changing placement of light/dark color values. If you are patient with fussy cutting of fabric motifs, you can create some truly stunning blocks, and really no two have to be the same. Starting in the center you stitch together 4 Honeycombs into a cross (hence the name of the block), then you add another 4 Honeycombs (covered in a different fabric), nestling them into the axles of the cross.

These mirrors were useful for previewing how the fabrics would look in the hexie shape next to each other. Check out this link to Pinterest for a zillion looks for this blocks and lots of tips and tricks.
 
Lot's of different fabrics from very traditional to contemporary....


This is as far as I got, but I am liking the look so far!

 
This seems like a fun activity to take while traveling or watching tv for those that like to keep themselves busy!

Saturday, January 23, 2016

Wonder Cut Ruler Class

 
Acknowledging that I have plenty of UFO's, I still succumbed to peer pressure and signed up for a class on the Wonder Cut Ruler at our local quilt shop. The ruler is billed as, "The Fastest and Easiest Way to Make Half-Square Triangles!!! " on the website.
 
Armed with my new ruler and a nifty pile of batiks, I set about cutting the strips for the quilt.
 
 
It's a two part class, with today mainly the cutting and beginning sewing. Of course there was plenty of chatter about the big east coast snow storm, that pretty much gave us just nuisance snow.
Here is my partial pile of strips....I went with yummy batiks because, you can't go wrong with yummy batiks!

 
Lot's of color schemes in the room. This will be a quilt to feature the color play rather than prints on fabrics.


The technique has you using the ruler to cut strips that then, after sewing on both sides, turn into half square triangles. It's pretty mindless sewing.


Here is my first stack- I have 8 versions of hst's to make. Since the weather is crappy, I may make a dent in this through the weekend. More to come!


Tuesday, January 12, 2016

Quilting in the Family

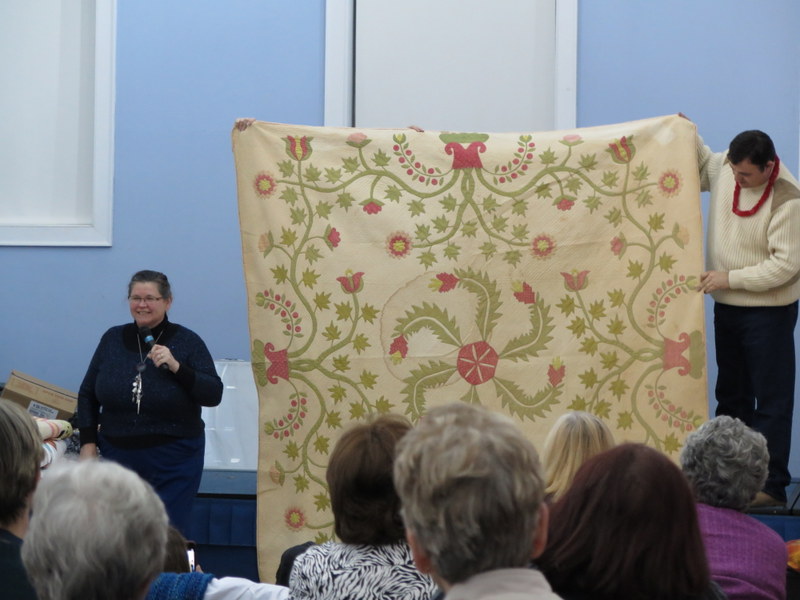
We had a fun meeting of the  Tidewater Quilter's Guild last evening, with lots of planning for the year to come including our Spring Fling and Biannual quilt show. We enjoyed our program which had members sharing quilting in their family.
 

This quilt was finished by a guild member from blocks that had been given to her by her mom. Circa 1930 fabrics.

This blue and white Irish chain was made on  a treadle circa 1930.
 
This quilt was pieced using fabrics that were scrap leftovers from a nearby pajama factory!

 
This quilt was pieced by Lakota Indians, a plains tribe whose tradition is to commemorate the death of a tribe member or friend with a star quilt.


This quilt was pieced from the member's grandmother's dresses.

This quilt was pieced using a coaster as a template for the applique and a treadle machine for the assembly.
 
This quilt was made around 1900 from "high end" dress good scraps as well as hat fabrics. It's tied, not quilted.

 
This quilt was made in 1860! Appliqued by the member's great grandmother.

 
This yo-yo quilt is 100 years old!! The fabrics are amazing!!!


It was so much fun to see everyone's treasures!!

Wednesday, January 6, 2016

Sewing-Unsewing-Resewing

It all started out great, and simple enough- sew a French seam pillowcase, another of the Christmas gift projects that did not get finished because of my whirlwind ride with viral bronchitis in December. So, I pulled the fabrics from the bag to get this one done!
 
A family member has lots of roots in Wisconsin. I recently traveled there and visited two outstanding quilt shops, Millhouse Quilts, in Waunakee and Patches and Petals, in Bellville, WI. Both were fun to wander around in with a great selection of fabrics, lots of project samples and friendly staff. I picked up the Wisconsin Badger fabric to do a pillowcase there.
 
So simple enough, I have made at least 10 of this type of pillowcase.
 
I cut the fabrics-
 
Body Fabric= 27 inches by WOF
Cuff Fabric= 10 inches by WOF
Band Fabric (optional but cute)  = 2.5 inches by WOF

 
I ironed the band in half with wrong sides together.
 
I laid the cuff  fabric down with the right side out. (Spoiler alert- THIS IS WRONG!!)

 
I did the burrito roll, feeling quite pleased with myself!

 
I stitched the edges of my burrito....

 
And I turned it....and instantaneously knew I DID IT WRONG! I has made a lovely pillowcase with an inside out cuff. Ugh.
 
 
So, I unsewed, repinned and hoped that it would work this time.

 
Resewing......fun, fun, fun! The cuff must be right sides together to turn correctly.


Success!! Everything where it belongs with a little top stitching to keep the cuff crisp.


FINIS!


There is a really nice tutorial on this website if you want to make your own French Seam Pillowcase... Smashed Peas and Carrots French Seam Pillowcase in Under 30 Minutes

Tuesday, January 5, 2016

Allietare Week 6- The Reveal!

I have been making steady progress on my Allietare Mystery Quilt over the holidays, squeezing in stitching time here and there. Chain piecing mass quantities of clues.....
 
 
Can you tell I am putting off the ironing....I HATE ironing, a necessary evil for a quilter.
 
 
Ironed me up a big box of clue parts.....
 
 
And then surprise, surprise as I was stitching clues on New Year's Eve, Bonnie posted the reveal! You can see it at Allietare Mystery Reveal.
 
Immediately, I had to assemble a couple blocks to see what my Christmas color pathway would look like....
 

I am very happy with the results! Can't wait to get the whole top together!
 
 
 You can see other Allietare shares at the Mystery Monday Link-Up Week Six!


Monday, January 4, 2016

My First Finish of the New Year!


 I had a few hours on New Year's Day to do some sewing. After being sick for a good part of December and hardly sewing anything at all, I had to catch up. This project was intended to be a Christmas gift for my sister. Lucky for me, our "Christmas" was beginning New Year's night, so I had not a minute to spare!

On New Year's,  I always enjoy stitching while live streaming the Philadelphia Mummers Parade String Bands. So with bands a playing, I set to finishing my sister's Mondo Bag using my step-daughter's blinged out machine.


 I had already fused and stitched the panels for the bag, so I just needed to construct the bag.


 Attaching the handles always wigs me out a bit. It feels like an all or nothing commitment to getting them to lay the right way.

 
The "turn" where you find out if it all came together....
 
Top stitching after the turn.


It turned out great!


I like to put silly pockets in my bags....this one got two lizard pockets!
 
My sister was happy with her bag, and I have my first finish of the new year on January 1st! Yeah me!!


I also got a little Instagram time and found my theme for sewing for 2016.... "Sew My Stash!" I plan to follow along and finish some things that are in my stash...things that I really like!! You can follow along "Sew My Stash" at Project Leasa